
DeepSeek Harness Beginner's Guide: From Zero to Your First AI Agent
What this tutorial covers
DeepSeek Harness (dsh) is an open-source AI agent platform created by DeepSeek, built on the Cordis plugin system. In plain words: it lets you run an AI that can read and write files on your computer, execute commands, and work on real projects — all guided by you.
This tutorial assumes you know nothing about terminals, Node.js, or AI agents. We explain every concept before we use it. By the end you will have the Web UI running, your model configured, and your first agent task completed. We also cover the command-line (CLI) mode and the Python SDK for more advanced use.
Which version? This tutorial covers the public developer preview released in August 2026 (0.1.0-rc.5) — the same code as deepseek.com/harness and the @deepseek-ai/dsh npm package.
Time: 30–45 minutes Difficulty: Beginner
Before you start
| Item | Requirement |
|---|---|
| Operating system | Windows 10+, macOS 14+, or Linux |
| A terminal window | You will learn how to open it below |
| Node.js | Optional but recommended — only needed for the npx install path |
| Model access | A DeepSeek API key (takes 2 minutes to create; we explain below) |
| A project folder | Any folder on your computer where your work lives |
How much does it cost? The software itself is free and open source (MIT license). You only pay the model provider for the AI usage, measured per token (a token is roughly a fraction of a word).
What is "an AI agent"?
Think of a normal chatbot: you type a question, it answers. An agent goes further — it can *do* things: read files, edit them, run commands, search the web, and chain many small steps together to finish a goal you describe in natural language. DeepSeek Harness is the "body" that gives the model these hands; the model is the "brain".
What is "a model"?
The AI "brain" is called a model. DeepSeek's models are made by the same company that made this harness. To use a model you need two things: an API endpoint (the address the software talks to) and an API key (your personal password to that address, tied to your billing account).
What is "a terminal"?
The terminal (called PowerShell on Windows, Terminal on macOS, and Konsole/GNOME Terminal etc. on Linux) is a window where you type commands instead of clicking buttons. All installation steps in this tutorial happen there. If you have never used it, follow the section right below.
How to open a terminal (step by step)
Windows — open PowerShell
- 1Click the Start button (the Windows logo at the bottom-left of your screen).
- 2Just start typing
PowerShell— no need to click anything first. - 3When the list appears, click Windows PowerShell or Terminal.
- Windows 11 shows "Terminal"; Windows 10 shows "Windows PowerShell". Either works.
- 1If a blue User Account Control window pops up, click Yes.
How to paste a command: right-click anywhere inside the PowerShell window (or press Ctrl + V).
Step 1 — Check for Node.js and install if needed
The fastest way to install DeepSeek Harness uses a command called npx, which ships with Node.js. Let's check whether Node.js is already installed.
In your terminal, type the following and press Enter:
node --version- If you see something like
v20.x.xorv22.x.x— Node.js is installed. Skip ahead to Step 2. - If you see something like
command not found(ornode is not recognizedon Windows) — Node.js is not installed. Continue below.
Install Node.js
Go to nodejs.org and download the LTS version (the "Long-Term Support" one — the safe, recommended option). Install it like any other program: open the downloaded file and click through, keeping all default options. After installation, close and reopen your terminal so it picks up the new software, then run node --version again to confirm.
What is Node.js? Node.js is a free runtime that lets you run JavaScript programs on your computer. Many developer tools like Harness are distributed through its package manager, npm. You do not need to learn JavaScript for this tutorial — Node.js just quietly powers the tools.
Step 2 — Install and start the Web UI
Now the magic line. In your terminal, run:
npx @deepseek-ai/dsh webWhat is `npx`? When you run npx <package>, it downloads that package (this takes a minute or two the first time) and runs it. So this single line fetches DeepSeek Harness and starts it.
What should happen: you will see some log text, and a line that says something like:
DeepSeek Harness is running at: http://127.0.0.1:3080That http://127.0.0.1:3080 is the address of the Harness Web UI on your own computer. Keep this terminal window open — the server keeps running as long as this window is open.
Now open your browser (Chrome, Edge, Safari…) and go to that address: http://127.0.0.1:3080. You should see the DeepSeek Harness welcome screen.
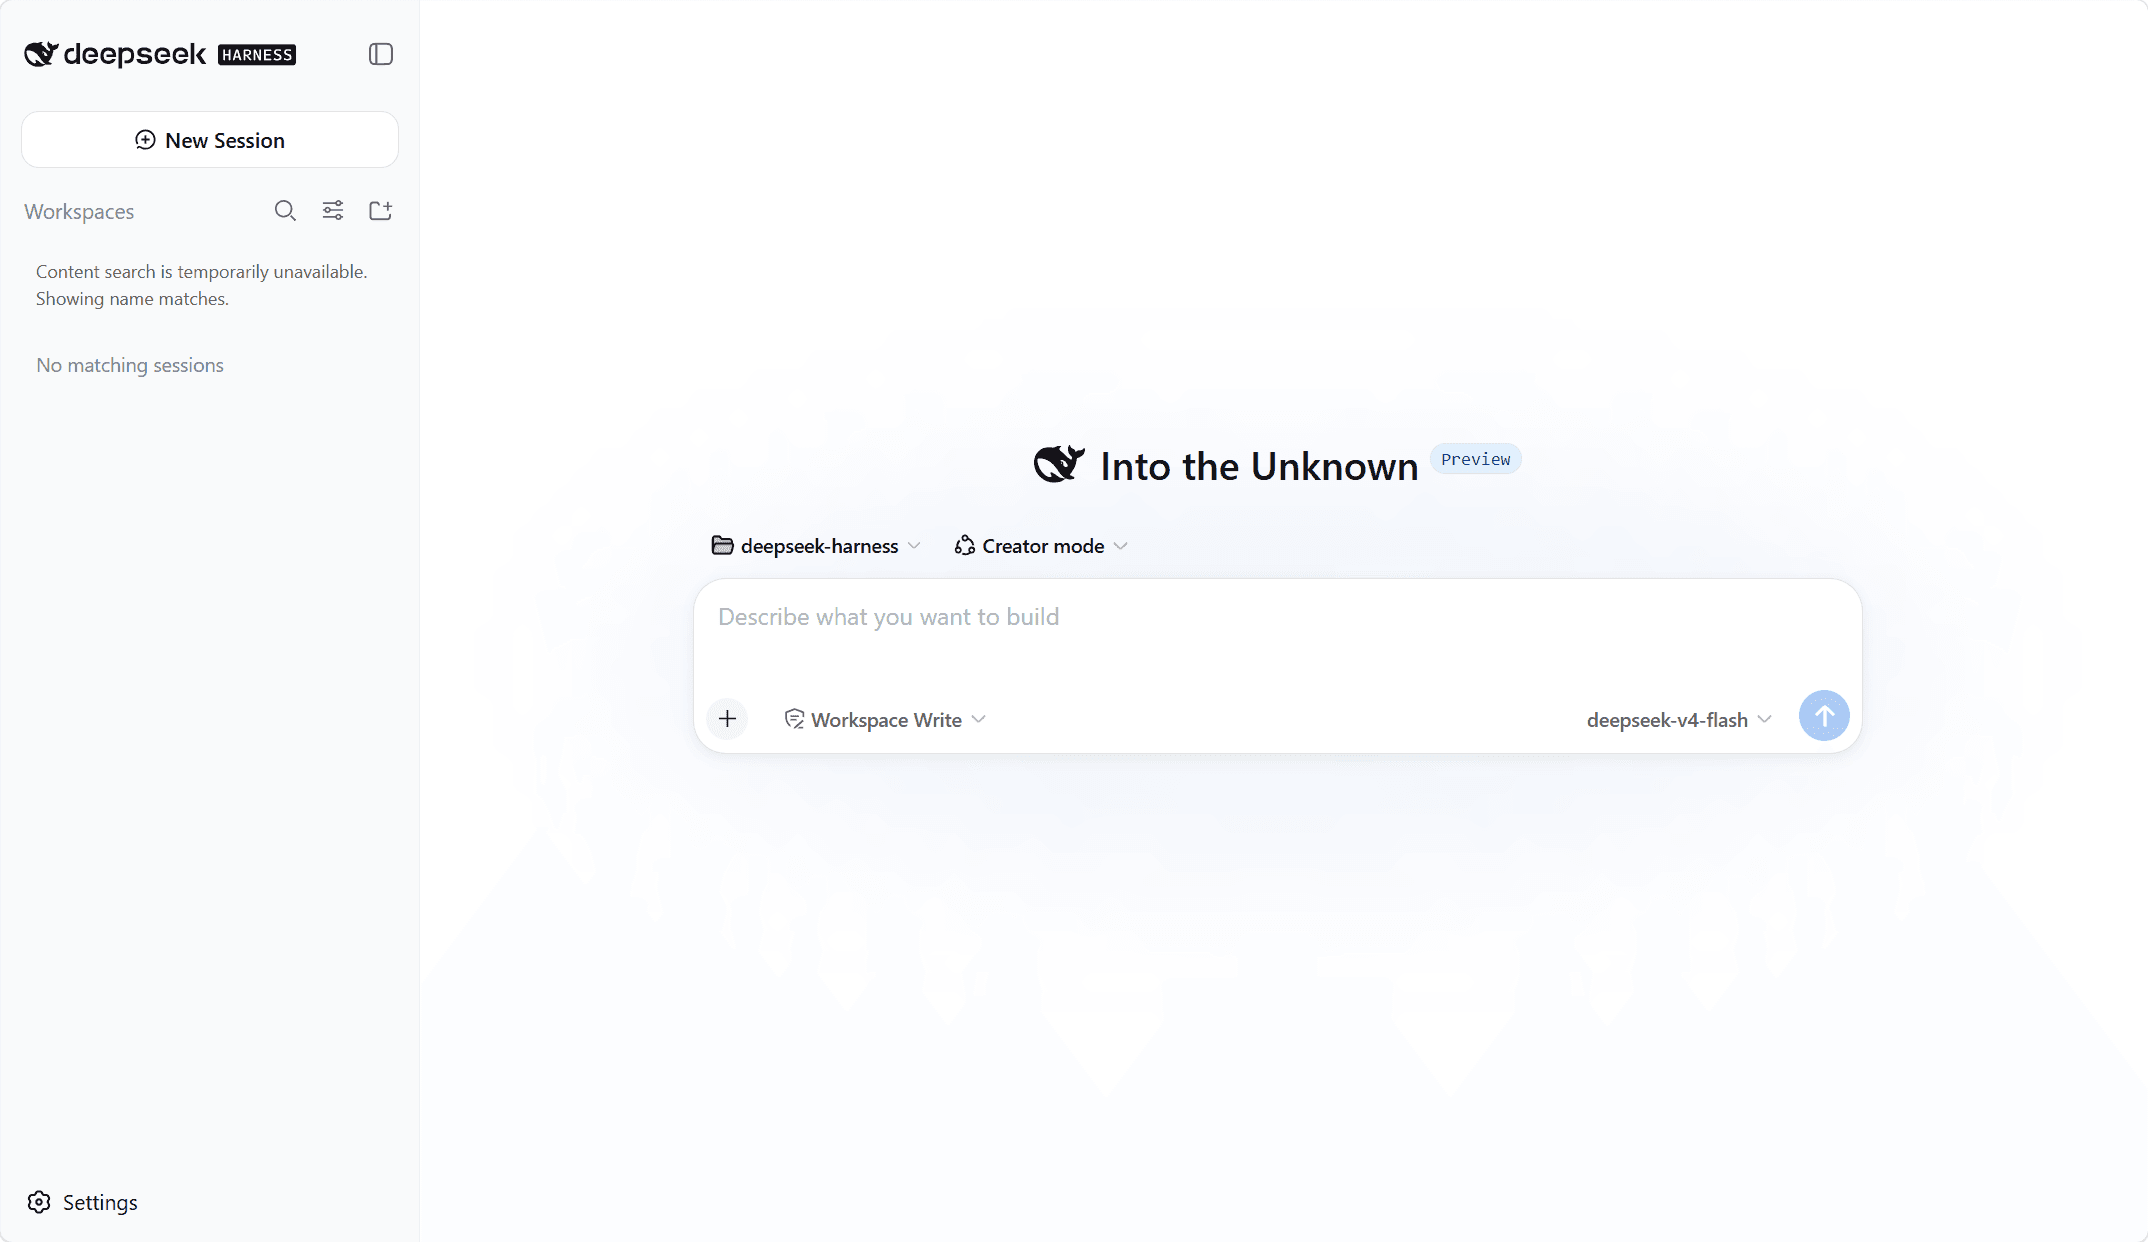
What does `127.0.0.1` mean? It is the universal address for "this computer" — like a phone number for your own machine. The :3080 part is the port, like an extension number. This address only works on your machine; nobody else can reach it.
Alternative: run from source
If you prefer the very latest code, clone the GitHub repository and build it (requires pnpm, the faster sibling of npm):
git clone https://github.com/deepseek-ai/deepseek-harness.git
cd deepseek-harness
pnpm install
pnpm run build
pnpm dsh web
Step 3 — Get a DeepSeek API key (if you don't have one)
To let Harness talk to an actual model, you need a key. A key is a long secret string — think of it as a password for AI usage.
- 1Go to platform.deepseek.com (DeepSeek's developer platform) and sign in or create an account.
- 2Find the API Keys page in your account.
- 3Click Create API key (or similar), copy the key, and store it somewhere safe — you won't be able to see the full key again after leaving the page.
Keep this key private. Anyone with the key can spend your quota (and in most cases, your money).
Step 4 — Configure the model in the Web UI
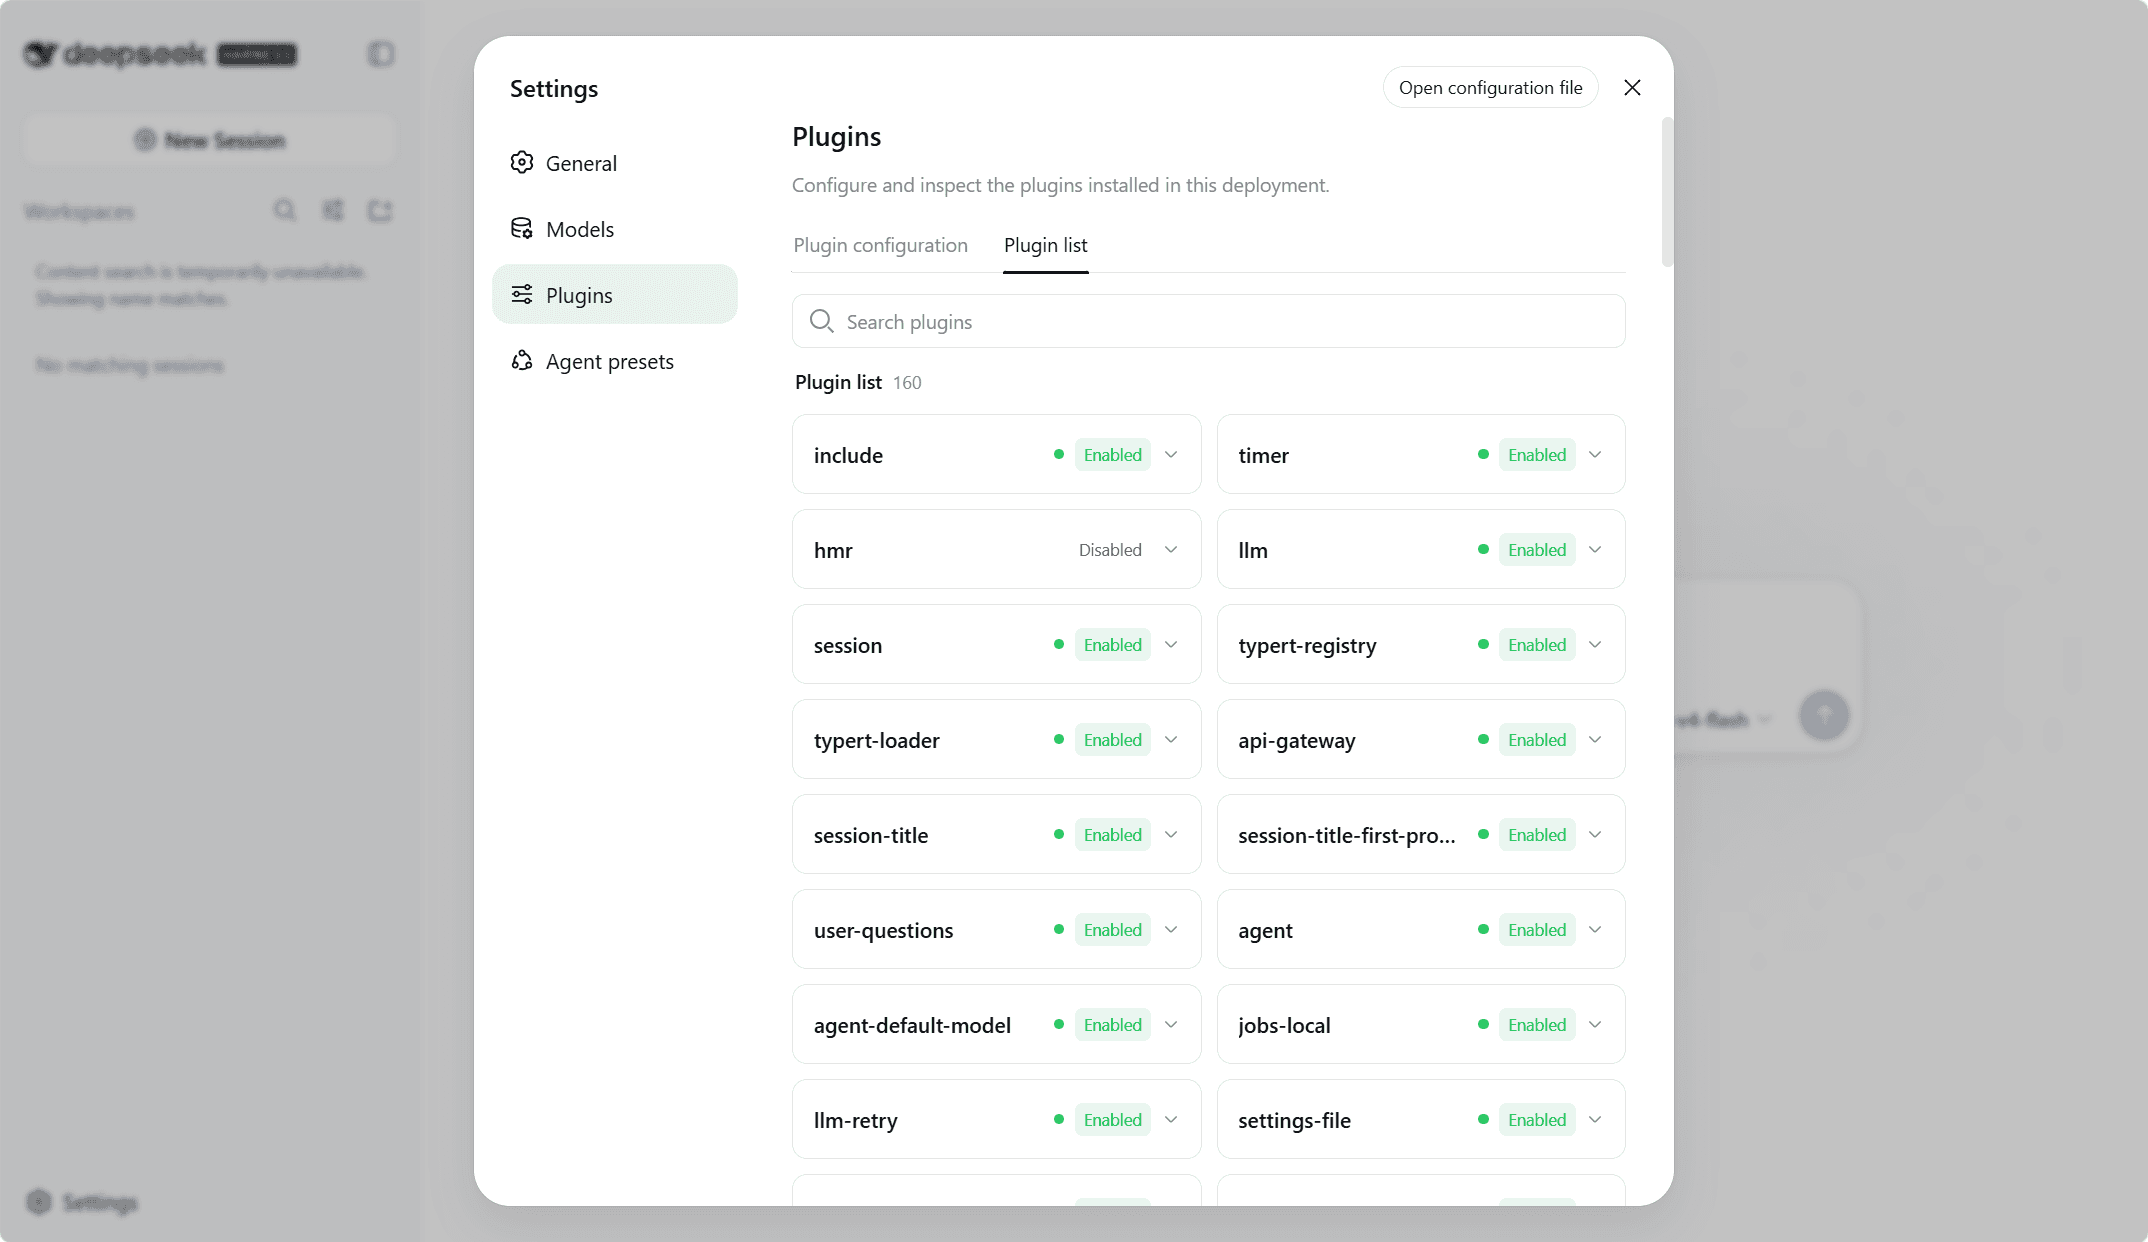
The Web UI starts with no model configured. Model changes take effect on the next request — no server restart needed.
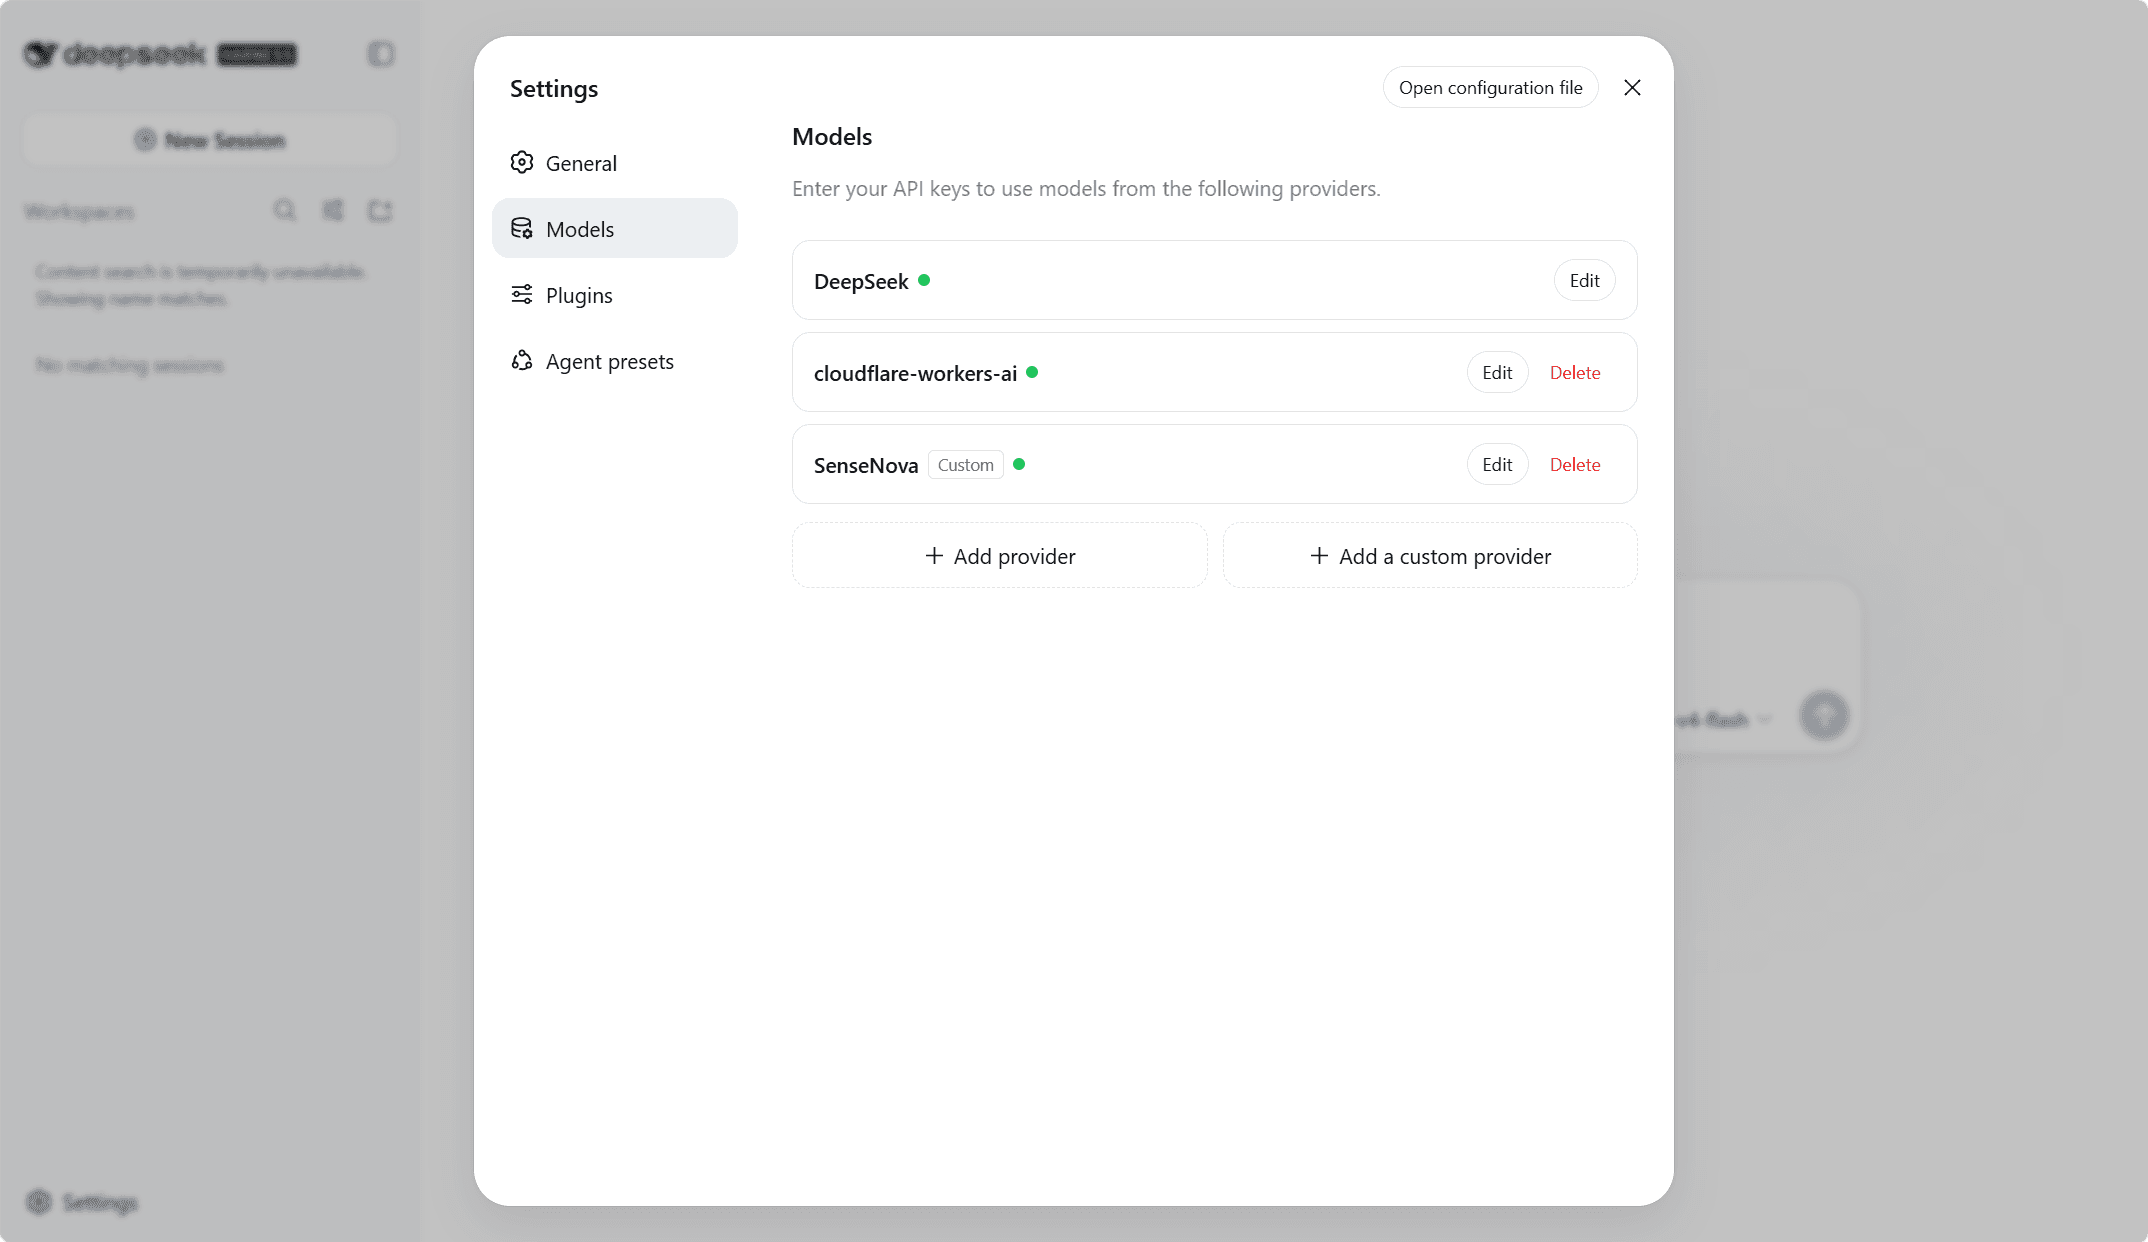
- 1In the Harness Web UI (http://127.0.0.1:3080), open Settings → Models.
- 2Find the DeepSeek card and paste your DeepSeek API key.
- 3Click Save.
The DeepSeek route becomes usable immediately.
For safety, the key is stored write-only: after saving, the UI only shows a masked descriptor, and the real secret lives in $DSH_HOME/.credentials.yaml (a private file in your home directory). Settings only keep a reference to the credential.
Adding other providers
You can also use models from other companies — for example Anthropic or OpenAI:
- Catalog providers — click Add provider and pick Anthropic, OpenAI, or another provider from the installed catalog. The endpoint, protocol, and model list come pre-configured.
- Custom providers — click Add a custom provider for a company gateway, a self-hosted server, or any OpenAI-compatible endpoint. You provide a lowercase Provider ID (permanent — requests, saved sessions, model defaults, and credential references all use it), a base URL, an API protocol, a credential, and at least one model. Use Fetch available models to probe the endpoint before saving.
Native-credential providers — Bedrock, Vertex, Azure, and Codex each need their own native credentials (AWS key + region, ADC project, api-version, OAuth). Just typing an API key in the generic field will not configure them.
Vision models on a custom provider
A model you enter by hand is treated as text-only until it says otherwise. To declare image support on a custom provider, edit the settings file $DSH_HOME/settings.yaml:
llm-pi-ai:
  providers:
    my-gateway:
      apiKeyEnv: GATEWAY_API_KEY
      api: openai-completions
      baseURL: https://gateway.example/v1
      models:
        - id: legacy-chat
        - id: vision-preview
          input: [text, image]
input accepts text and image and applies only to that model. To set a fallback for the whole route, use defaultInput: [text, image] at the provider level. DeepSeek's own chat-completions route is text-only and cannot be configured otherwise.
Step 5 — Choose a workspace
A fresh Web UI starts with no workspace selected — until you pick one, the message box where you type your task is disabled.
What is a "workspace"? It is the folder on your computer that the agent is allowed to touch. Anything inside it — files, code, documents — can be read, edited, or executed by the agent. Keep it to a project folder you trust, not your entire computer.
- 1Click Choose workspace in the UI.
- 2Add the project directory where you launched
dsh. - 3Select it.
Now the input box lights up and you are ready to go.
Step 6 — Run your first agent task
- 1Click Start session (or use the message box directly).
- 2Send a prompt. A good first task for a brand-new project folder:
> Summarize this repository and identify its main packages.
(If your folder is empty or not a project, try something like: *Create a new file called hello.txt with "Hello from DeepSeek Harness!" inside.*)
- 1Watch the agent work. It can:
- Read and edit workspace files
- Run shell commands (through a persistent Bash process)
- Delegate work to sub-agents
- Maintain a plan as it goes
Under the active permission policy, the Web UI will ask for approval before any operation that needs it — for example, deleting a file or installing a package. This is normal and by design; you can click through each request.
The four agent modes
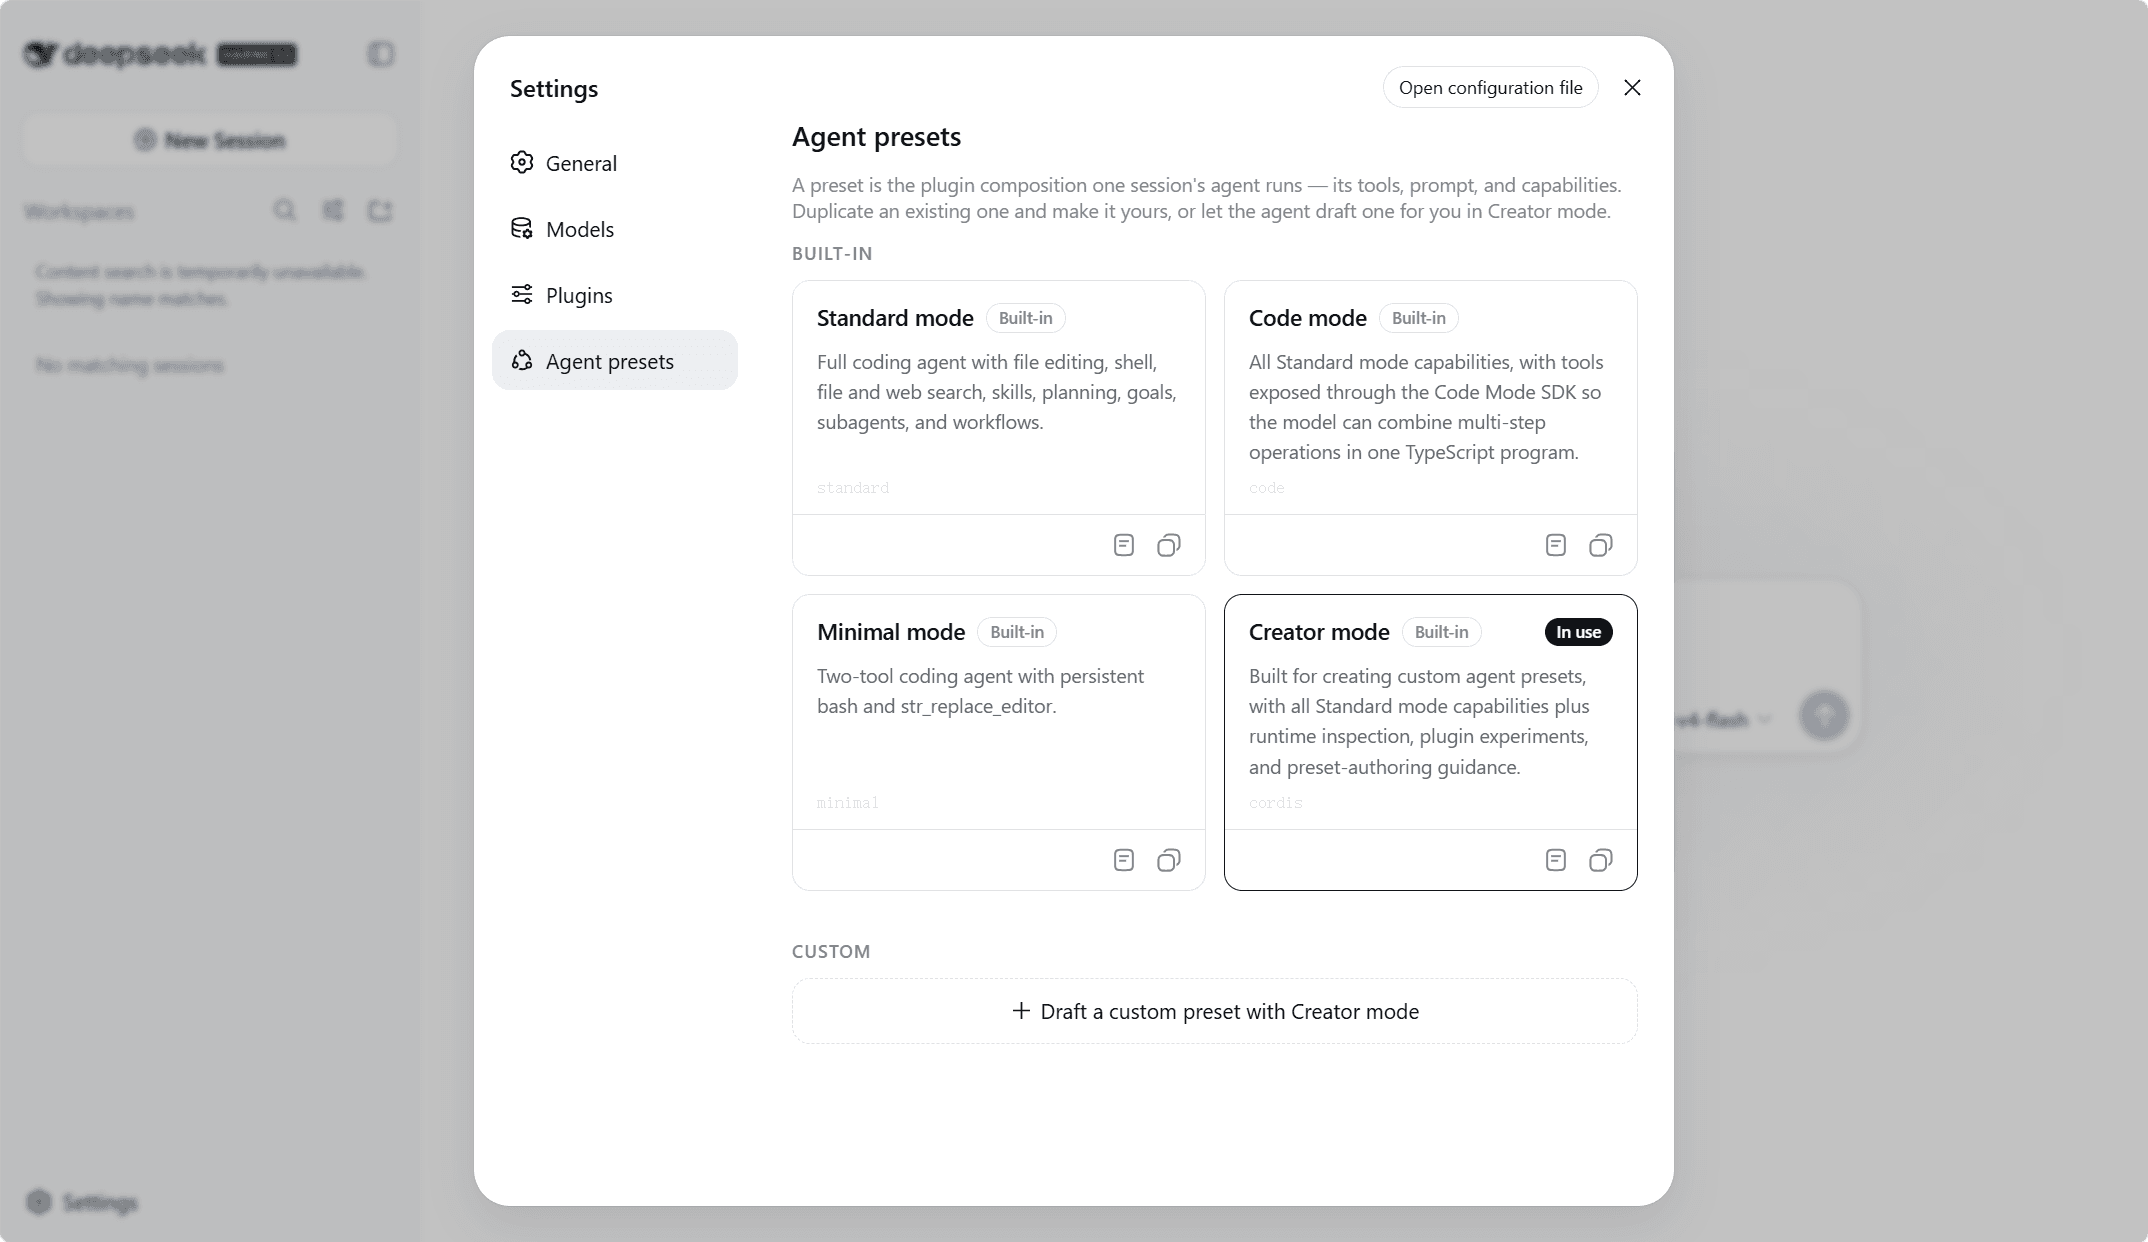
Use the mode selector in the session composer to choose how the agent behaves:
| Mode | Description |
|---|---|
| Standard | Full-featured coding agent with file edit, shell, search, skills, plans, goals, sub-agents, and workflows — the default choice |
| PTC (Code) | Standard capabilities, but tools are presented through the Code Mode SDK — the model assembles multi-step operations as a TypeScript program |
| Minimal | Only a persistent Bash process and str_replace_editor — used for minimal benchmarking |
| Creative | For authoring custom agent presets: full Standard capabilities plus runtime introspection, plugin experimentation, and preset-authoring guidance |
The Trajectory view
Every model interaction — system prompt, thinking, tool calls, results, sub-agent dispatches, context injections — is recorded as an append-only event stream in the session log. The Trajectory view lets you inspect it by source, and the same log powers recovery, forking, search, and full replay of the run. Great for understanding exactly what the agent did and why.
Step 7 — Going further: headless CLI
Beyond the Web UI, dsh exposes a headless entry mode for scripting and CI — a command that runs one task end-to-end without a browser, prints the final answer, and exits:
dsh --profile headless "Inspect the repository and fix the failing tests."The headless profile auto-initializes on first use from the shipped template.
The launcher supports four entry modes:
| Command | Purpose |
|---|---|
dsh --profile <name> | Boot the named profile under $DSH_HOME/profiles/<name> |
dsh --profile headless "job" | One-shot persisted session, print final answer, exit |
dsh web | Alias of --profile web |
dsh plugin --profile <name> <pnpm args> | Manage a profile's plugins via pnpm |
What is a "profile"? A profile is a named configuration: which plugins, models, and settings to use. A profile directory holds a package.json (with out-of-tree plugin dependencies and the dsh.profile manifest) and a cordis.patch.yml (your own patch layer). The composition tree merges, in order:
- 1each bundle's patch in
dsh.profile.bundlesorder - 2the profile's
cordis.patch.yml - 3the home-level
$DSH_HOME/cordis.patch.yml - 4
--patchoverlays
Use --dump-default-config and --dump-config to inspect the composed tree without booting it.
Step 8 — Python SDK (for programmers)
If you write Python and want to embed an agent in your own program, DeepSeek publishes an official Python SDK.
Prerequisites
- Python 3.10 or newer
- Linux x64/arm64 or macOS 14+ on arm64
- Git (to get the example)
Install
git clone https://github.com/deepseek-ai/deepseek-harness.git
cd deepseek-harness
python -m venv .venv
. .venv/bin/activate
python -m pip install deepseek-harness-sdk
The installed runtime ships its own Node.js — no system-level Node.js required.
Set credentials
export DEEPSEEK_API_KEY="sk-…"
# export DEEPSEEK_BASE_URL=http://127.0.0.1:8000/v1     # when using a proxy
# export DSH_MODEL=deepseek-v4-flash
# export DSH_SYSTEM_PROMPT='You are a helpful software engineer assistant.'
Run the checked-in example
python examples/jsonrpc-agent/minimal.py \
  --workspace /absolute/path/to/workspace \
  --session-root /absolute/path/to/sessions \
  --session-id example-001 \
  "Inspect the repository and fix the failing tests."
The script prints the final assistant response. The session-root receives a JSONL log with the assembled model requests and tool calls.
Use the SDK in your own program
from pathlib import Path
from deepseek_harness import DeepSeekHarness

config    = Path("examples/jsonrpc-agent/minimal.cordis.yml").resolve()
workspace = Path("/absolute/path/to/workspace").resolve()
sessions  = Path("/absolute/path/to/sessions").resolve()

with DeepSeekHarness(
    provider     = "deepseek-official",
    model        = "deepseek-v4-flash",
    max_tokens   = 49_152,
    cwd          = str(workspace),
    session_root = str(sessions),
    cordis       = str(config),
) as harness:
    result = harness.run(
        "Inspect the repository and fix the failing tests.",
        session_id="example-001",
    )

print(result.final_response)
DeepSeekHarness starts the bundled runtime lazily and reuses it until the context manager exits. Reusing the same harness and session id preserves the session-owned Bash process, its working directory, exported variables, and shell functions. Use a fresh session id for an independent task; reuse an id only when the next call should continue the same durable conversation.
Understanding the example composition
| Property | Value |
|---|---|
| System prompt | DSH_SYSTEM_PROMPT, falling back to "You are a helpful software engineer assistant." |
Model in minimal.py | --model → DSH_MODEL → deepseek-v4-flash |
| Model-facing tools | Persistent bash and str_replace_editor only |
| Bash timeout | 300 seconds |
| Editor output limit | 16,000 characters |
| Context compaction | Disabled |
| Session persistence | Uncompressed JSONL under DSH_SESSION_ROOT |
Note: this example composition omits harness identity, workspace prompt text, skills, one-shot Bash, task tools, compaction, and every other model-facing plugin. It uses danger-full-access, so run it only inside a disposable checkout or container. The persistent PTY backend requires a POSIX terminal substrate, so this composition does not support Windows agents.
Troubleshooting
| Symptom | Cause | Fix |
|---|---|---|
command not found / node is not recognized | Node.js not installed or not refreshed | Install Node.js LTS from nodejs.org, close and reopen the terminal, try again |
npx seems stuck on first run | First-time package download | Wait 1–2 minutes; a slow connection can make it look frozen |
| The Web UI does not open in the browser | The terminal window running dsh was closed | Restart it: run npx @deepseek-ai/dsh web again |
Fetch available models returns 401 | Wrong or missing key | Check the key for the provider; model discovery calls the OpenAI-compatible GET /models endpoint — for services without it, enter models manually |
Port 3080 already in use | Another dsh process is running | Stop the other process, or start on another port (see below) |
Next steps
- Add more providers — Bedrock, Vertex, Azure, Codex, and any OpenAI-compatible gateway via Settings → Models
- Develop a plugin — the docs at
docs/user/develop/basic/walk you through authoring your own Cordis plugin - Python SDK reference —
python/sdk/README.mdcovers lifecycle, results, notifications, runtime selection, and configuration - Cordis primer —
docs/cordis-primer.mdexplains the composition syntax at the heart of Harness
Summary
You went from zero to running your own AI agent. In this guide you:
- 1Learned what a terminal, Node.js, an API key, a model, and an agent actually are
- 2Installed
dshvianpx(or from source) - 3Created a DeepSeek API key and configured it under Settings → Models
- 4Chose a workspace for your agent
- 5Ran your first agent task in a session
- 6Explored the four agent modes and the Trajectory view
- 7Ran a one-shot headless session via CLI
- 8Installed and used the Python SDK
Everything in DeepSeek Harness is a plugin — and everything is MIT-licensed and free. Welcome to the agent world.